
Updated 21.10.2019
If the dress is to be sold in different colors and sizes, or the computer game for various platforms: With the free shop system WooCommerce you can easily create different variations of a product. Our instructions will tell you how to create variable products in your online shop and what you need to keep in mind.
Notice: The following steps are based on our Tutorial for creating simple products. You should read this tutorial first to know all standard product options. Because they also apply to variable products.
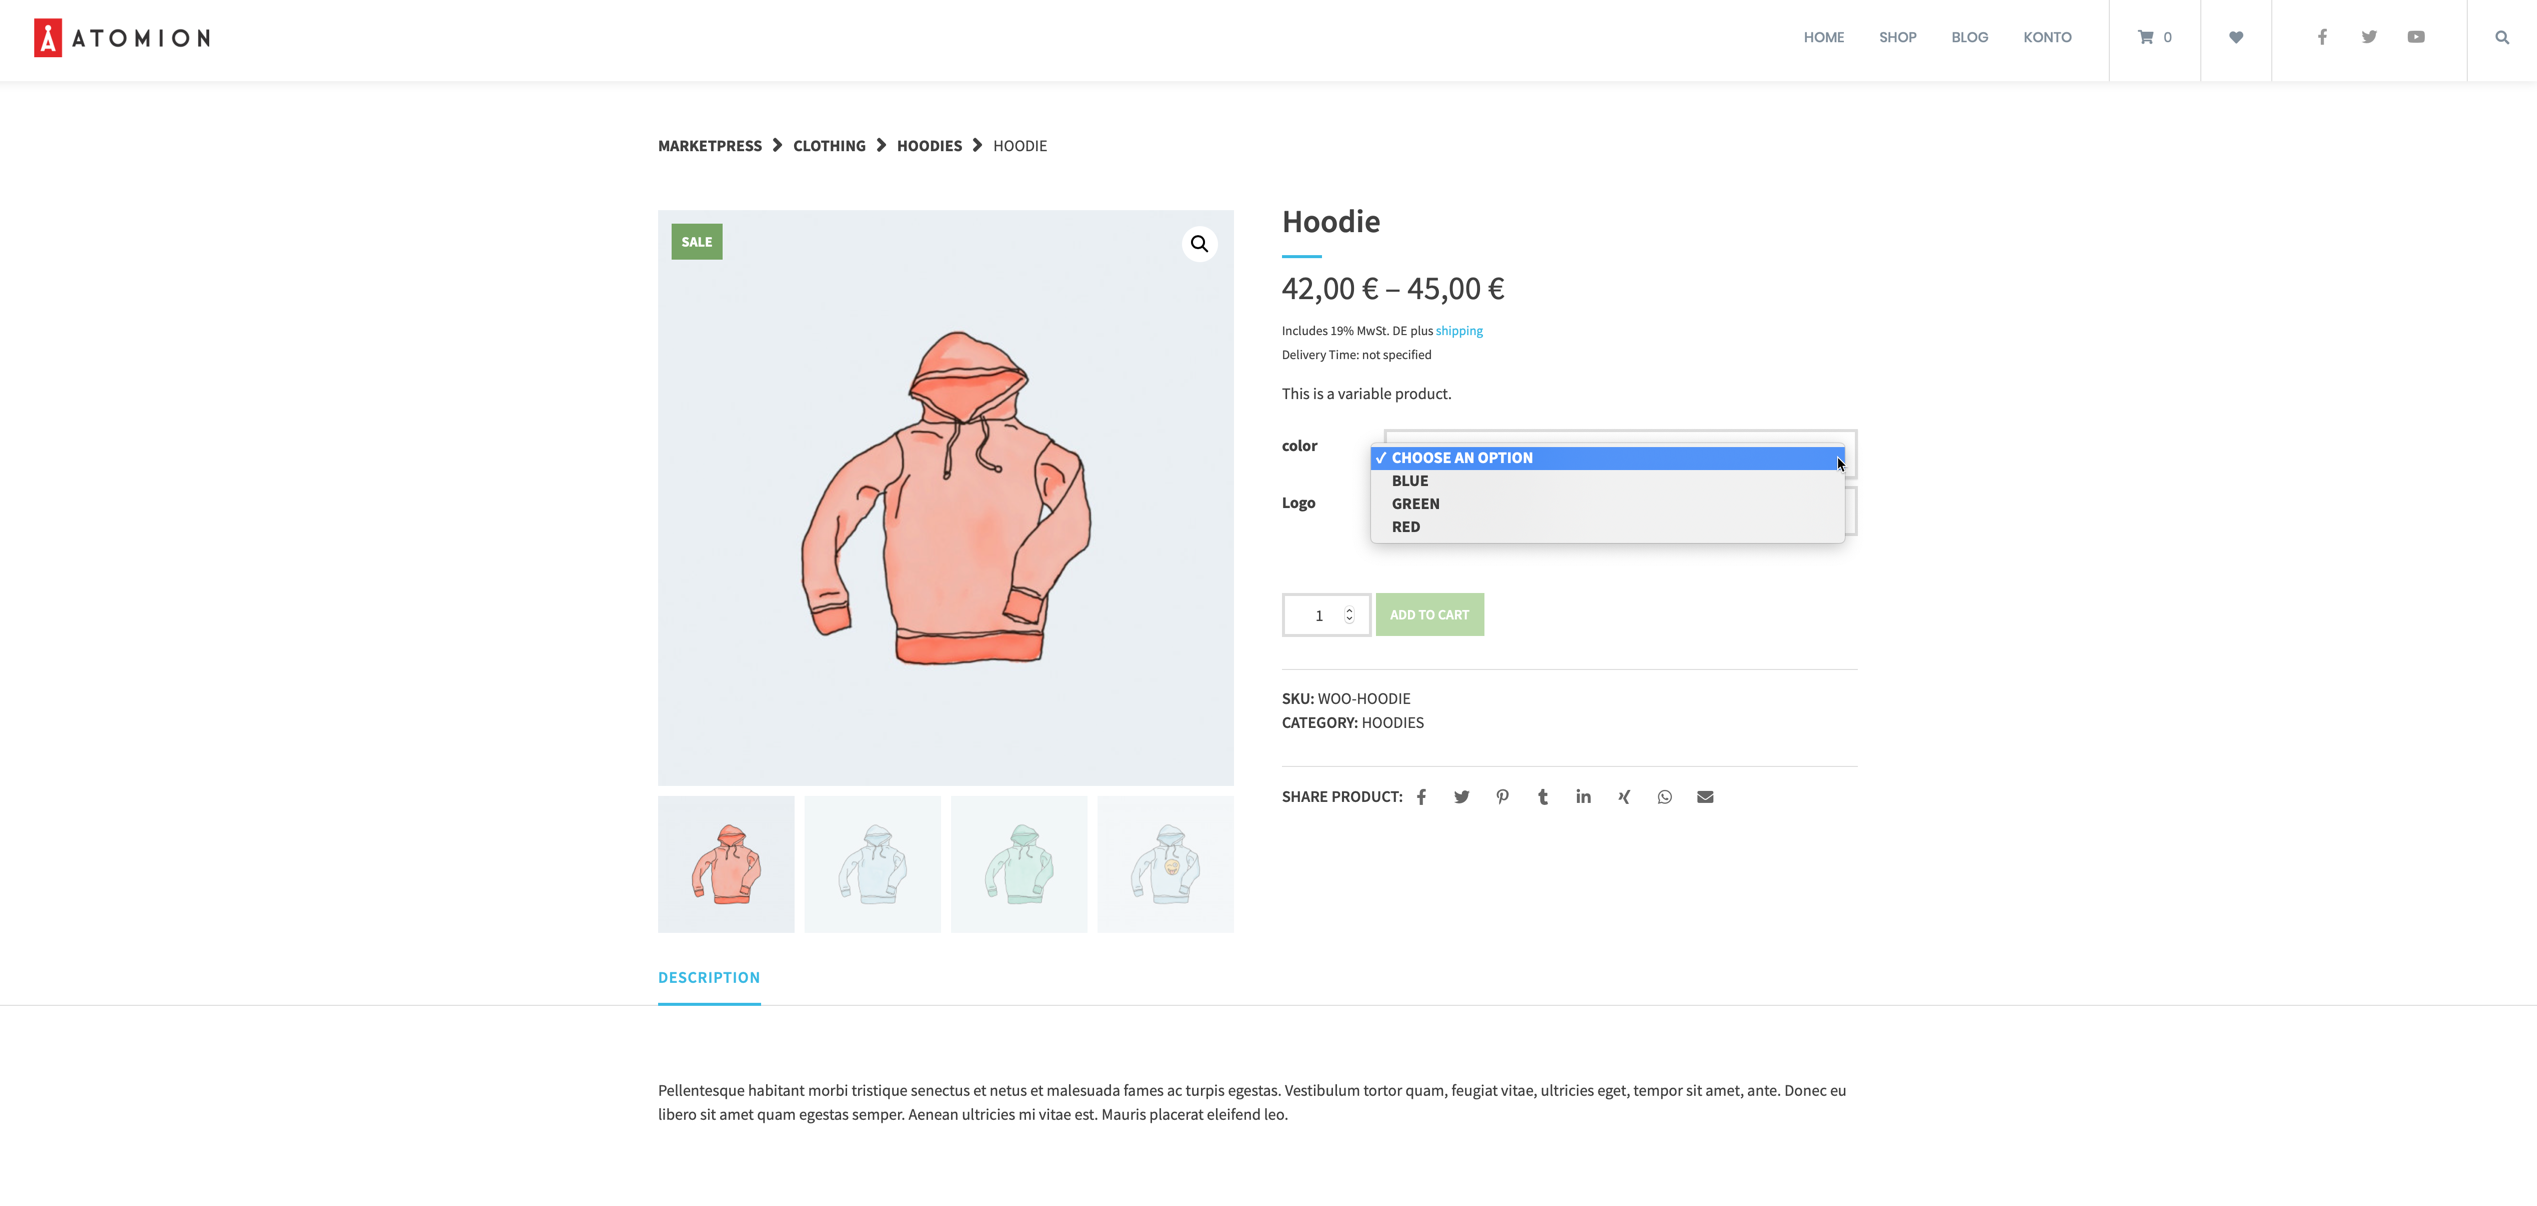
An example will quickly show you how variable products can be used in your shop. In the following case – from the Demoshop of our Temes Atomion – the color can be selected as a variation:
Define product attributes
To work with variable products, you must first define their attributes. For example, the colors, sizes and other attributes of your offers. To do this, go to Products → Attributes in your WordPress dashboard:
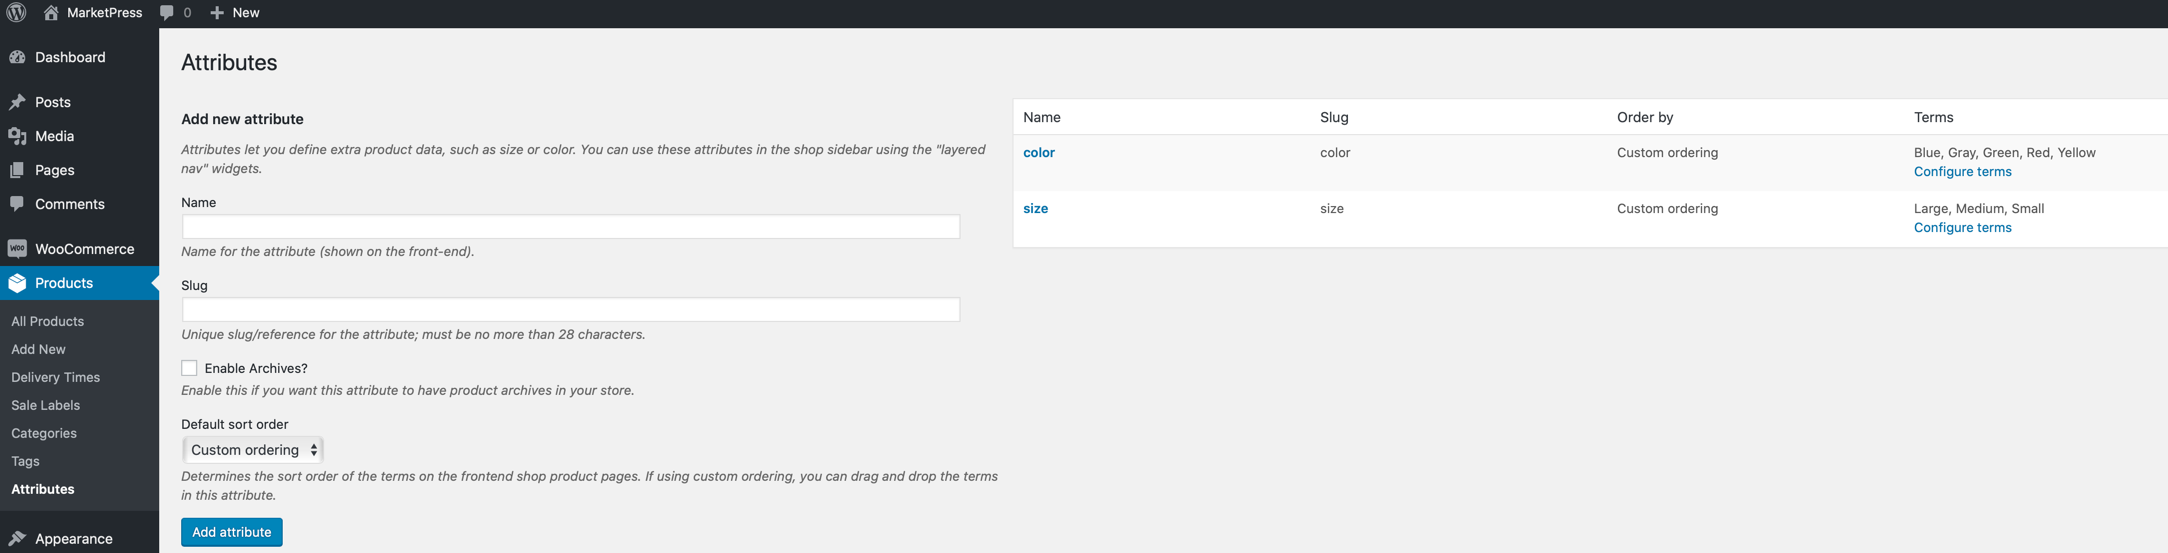
In this case, variations for color and size have already been defined. If you now want to add a property to your webshop yourself, fill in the fields under “Add attribute” as follows:
- The Name of the property as it will be displayed later in the shop, for example “Size”.
- The Slug (formerly “title form”) is an internal WooCommerce name that can be used as a control element in individually programmed shops, for example. It’s best to choose the same name as the property name.
- check Enable archives if you want this product property to be available as a navigation level in your shop. Then your visitors can see all products of one size in one overview.
- The Default sort order determines the order in which the terms are displayed in the shop for selection.
Finally, click on “Add attribute” to save the new product property. Now you have to assign individual values to the property, which the customer can then select in the shop. To do this, click on “Configure terms”:

Here you create the individual entries, in our example “Large”, “Medium”, “Small”:
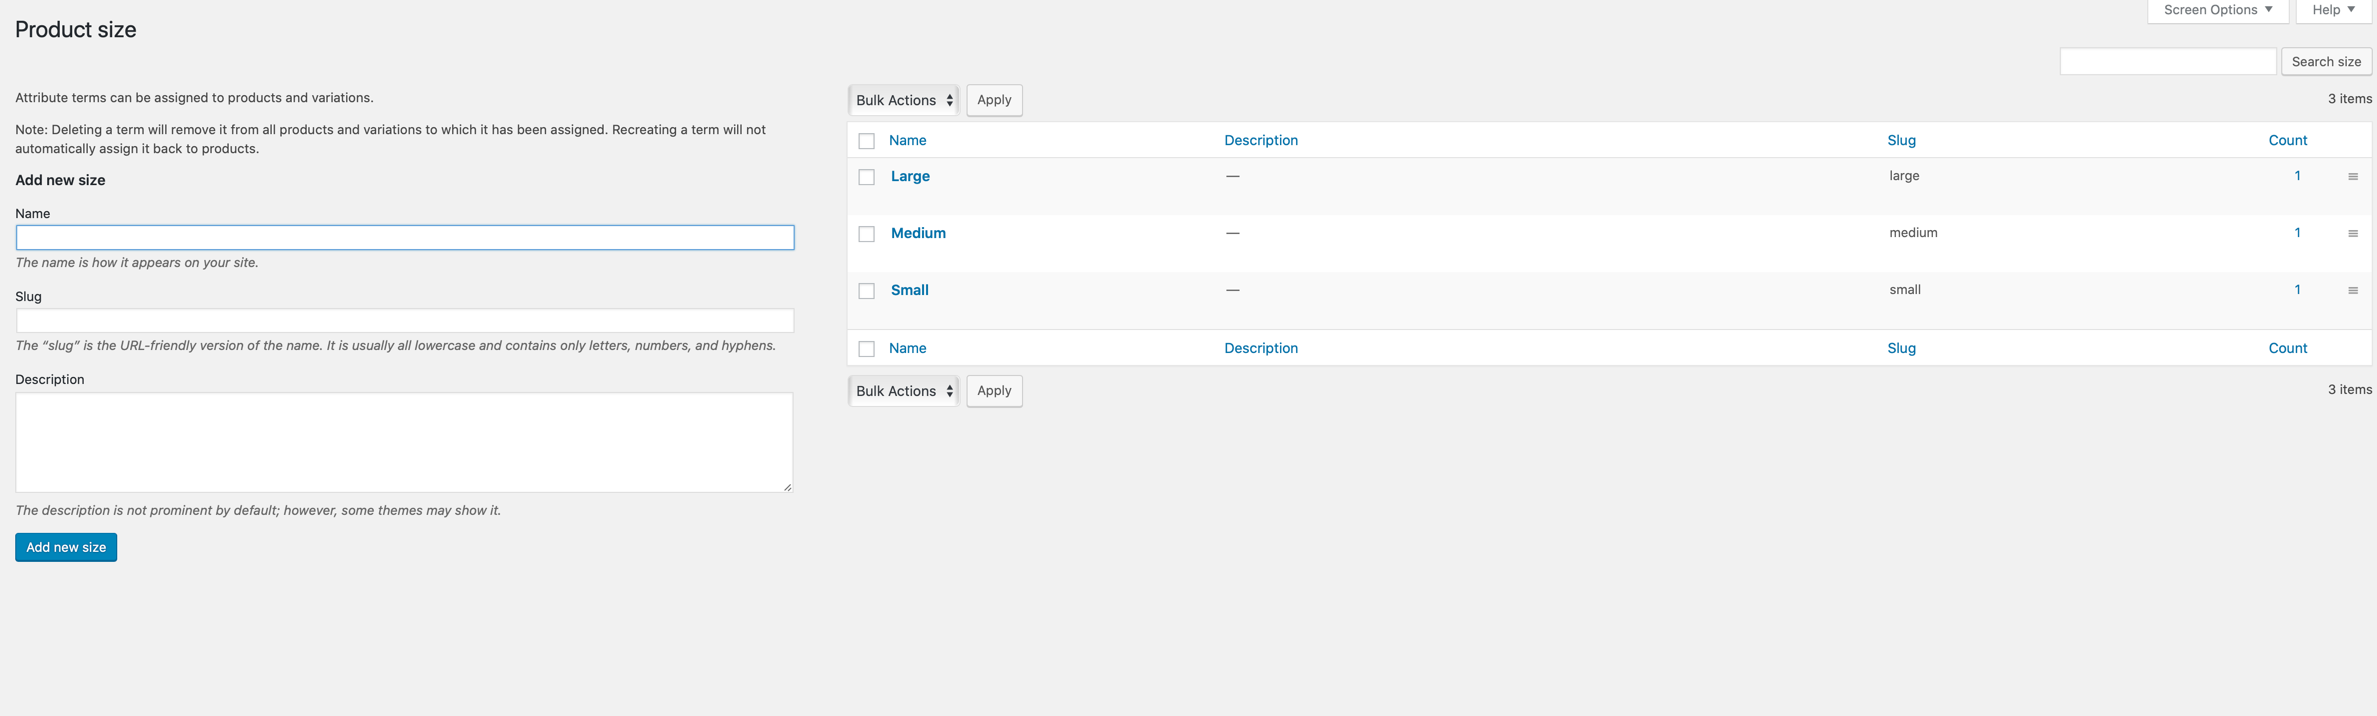
- Select the Name of the value you want to be displayed in your online shop.
- The Slug is the variation of the name used within the URLs of your shop. You can also enter the name here, but in lower case, with umlauts (“oe” instead of “ö”) and without special characters (numbers and hyphens are allowed).
- Whether the Description is displayed for the individual values in the shop depends on the WordPress or WooCommerce theme used.
Finally click on “Add new” below. Once you have created the required product properties and their values, you can start entering the products.
Create Variable product
Go to Products → Create to create a new product. In the selection field next to Product data select the entry “Variable product“:
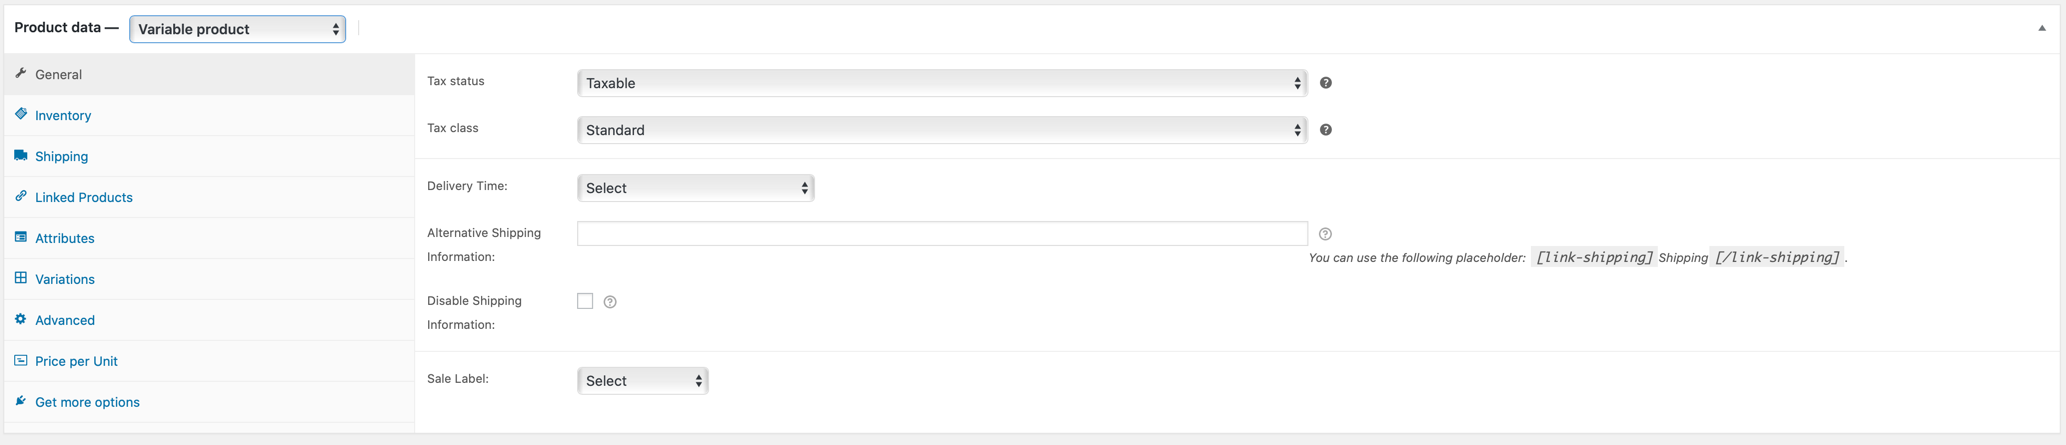
Among other things, some fields that you know from the maintenance of simple products are hidden in the “General” tab. These are defined elsewhere for variable products, more about this.
Switch to the Attributes tab. There select the property which should distinguish the variations of the product. If there are several distinguishing features, you can repeat this step, more about this. Finally click on “Add”:
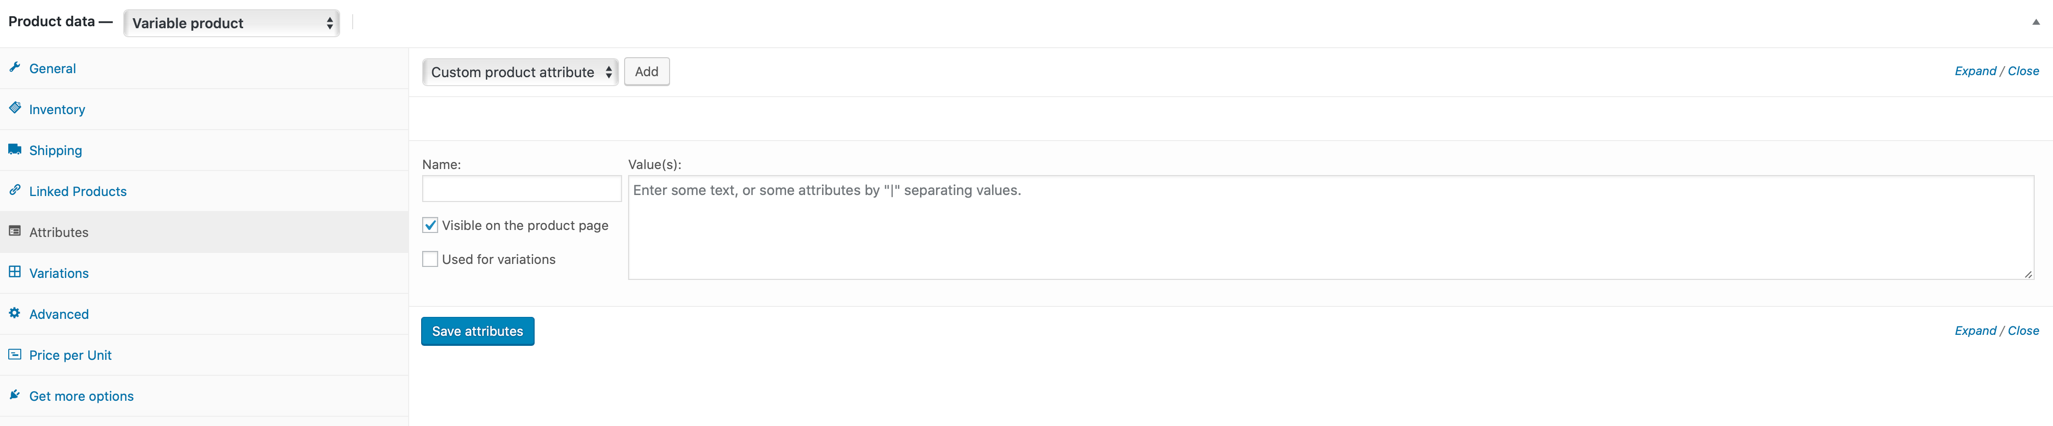
Notice: Here you can also create new, user-defined product attributes (“User-defined product attributes” instead of “size” in the selection field), see the corresponding instructions from WooCommerce. In practice, the central maintenance of product properties under Products → Properties has proven its worth in order to maintain an overview. This also applies in the event that several employees are commissioned with product maintenance who are only to use existing values.
Here’s what you do:

- Select under Value(s) those entries which should be available for the corresponding product. Alternatively, click Select all to apply all existing values.
- If you check Visible on the product page, the available values will not only be displayed in the selection box on the product page, but also in a separate “Additional information” section below the product description.
- The Used for variations option must be enabled for the variable product to have the selected properties. So you have to click on it in any case. Unfortunately WooCommerce does not do this on its own or by default.
- The button Add new in the “Value(s)” selection field allows you to create additional attributes for the property, as an alternative to central maintenance under Products → Properties.
Don’t forget to confirm the button Save attributes at the end, only then the selected options will be saved and activated. If you want to maintain several product properties at the same time, select the additional attribute (e.g. “Color”) in the selection field above and click on “Add” next to it.
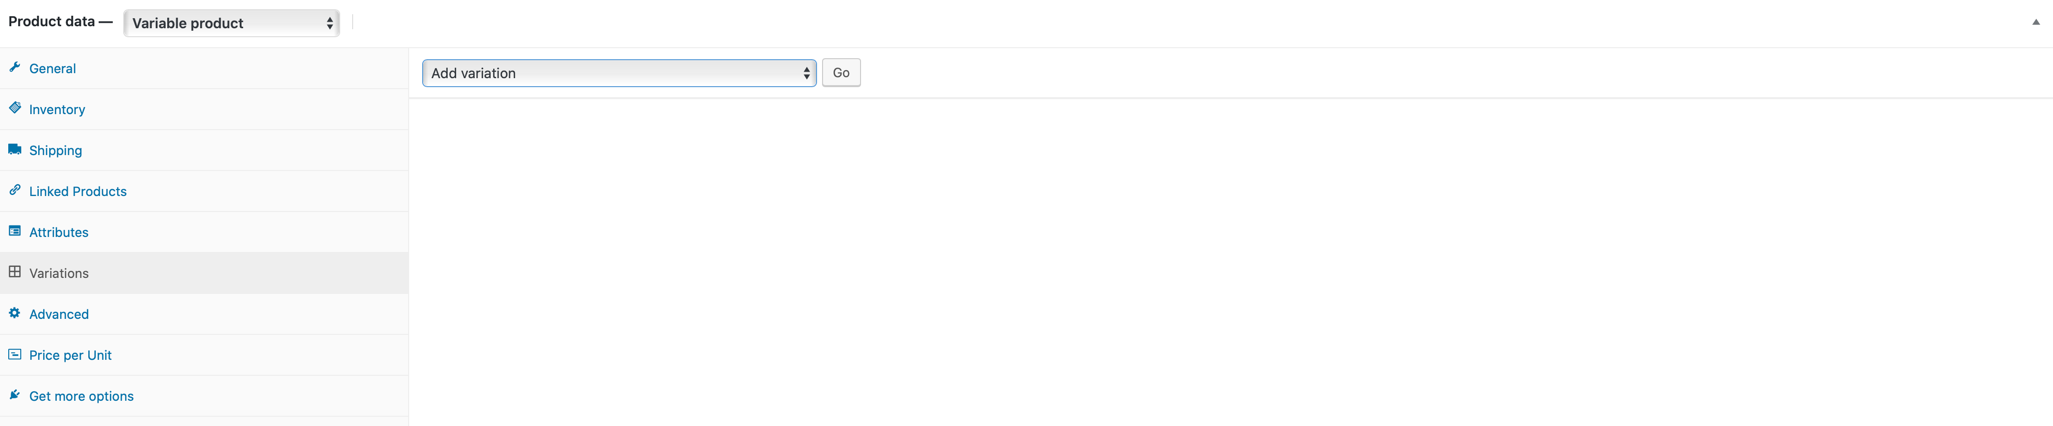
Add variations
Now go to the tab Variations. This is where the final creation of the product(s) takes place.
Note: You will get an error message if you have not created any properties before. Or if you forgot to save them by clicking on “Save properties”.
Click “Add variation – Go”:
Notice: By selecting “Create all variations from attribute combinations” instead of “Add variations” you can automatically create variations for every possible combination of properties. This makes sense if, for example, each individual product variation should have its own price or inventory. Note, however, that with numerous properties or values this quickly leads to a very large number of product variations.
First of all, you determine which variation of the product you want to create:
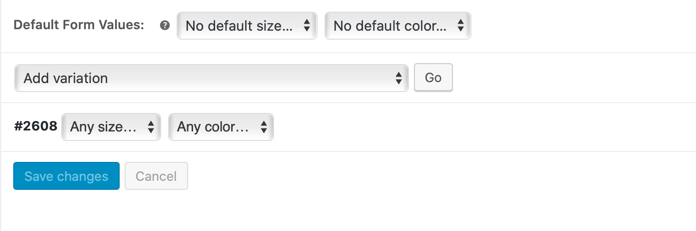
Instead of “Any size” and “Any color” you select the concrete product properties, for example “Large” and “Grey”. Then go to “Save changes”. After entering all options for this variation (more about this) you can create all further variations, again via “Add variation -> Go”.
Notice: If the variations of your product do not differ in one dimension, e.g. all colors cost the same, are available the same etc., then you could leave the entry “Any color” in this case. You would then only have to create variations for the individual sizes.
If you now click on the number in front of the variation you just created, the options will open. These can be maintained separately for each variation:
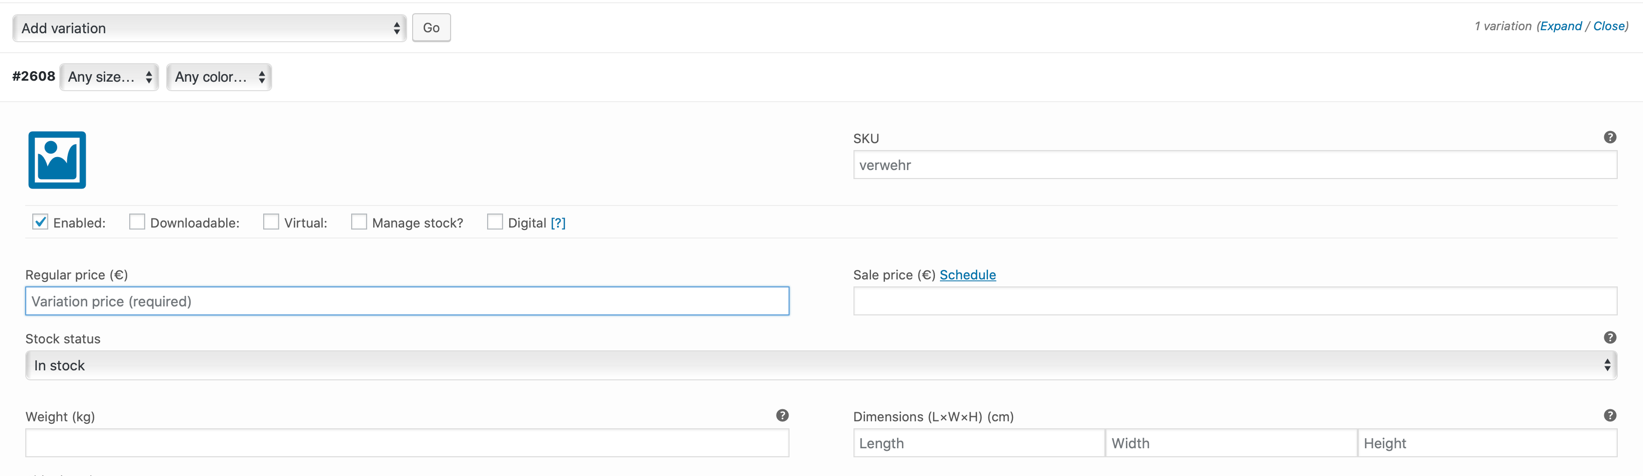
-
- Click on the blue icon at the top left to upload an individual product photo for each variation.
- For better logistic processing, each variation can be assigned its own article number (SKU). This works in the same way as for simple products.
- Determine if the product is visible, i.e. Activated, if it is Downloadable, Virtual or Digital (see her).
- First you check Manage stock, the additional fields Stock and Allow backorder will open. The Storage status (in stock or out of stock) can be maintained in both cases.
Notice: Note that WooCommerce only controls or reduces the inventory for the individual variations once a corresponding product has been sold.
- Define for each variation the Regular price, if necessary (optional) a sale price with sale period, the weight and the size. Further explanations on the individual options can be found in our Basic tutorial on product creation in WooCommerce.
- Enter optionally a Description for the variation.
Don’t forget to click on “Save changes” at the end.
Important: If the item number, weight, size and stock information is not entered at the variation level, the parent values of the entire variable product are applied. For the shipping group and tax class, you can specify in the corresponding field of the variation whether the higher-level values are to apply or whether you want your own. You will find all cross-product properties as usual under the tabs “General”, “Stock” and “Shipping”. The price must always be set at variation level.
As in all other areas of WooCommerce also applies here: The available options initially look more complicated than they actually are. But they offer a lot of leeway for you and the product range of your WordPress online shop. Once you have created and tested a few variable products, the rest is almost self-evident.
Mass processing of variations
With complex variable products, innumerable variations can quickly emerge, the maintenance of which is correspondingly time-consuming. Then the mass processing function can help. The corresponding items open when you click on the “Add variation” selection field:
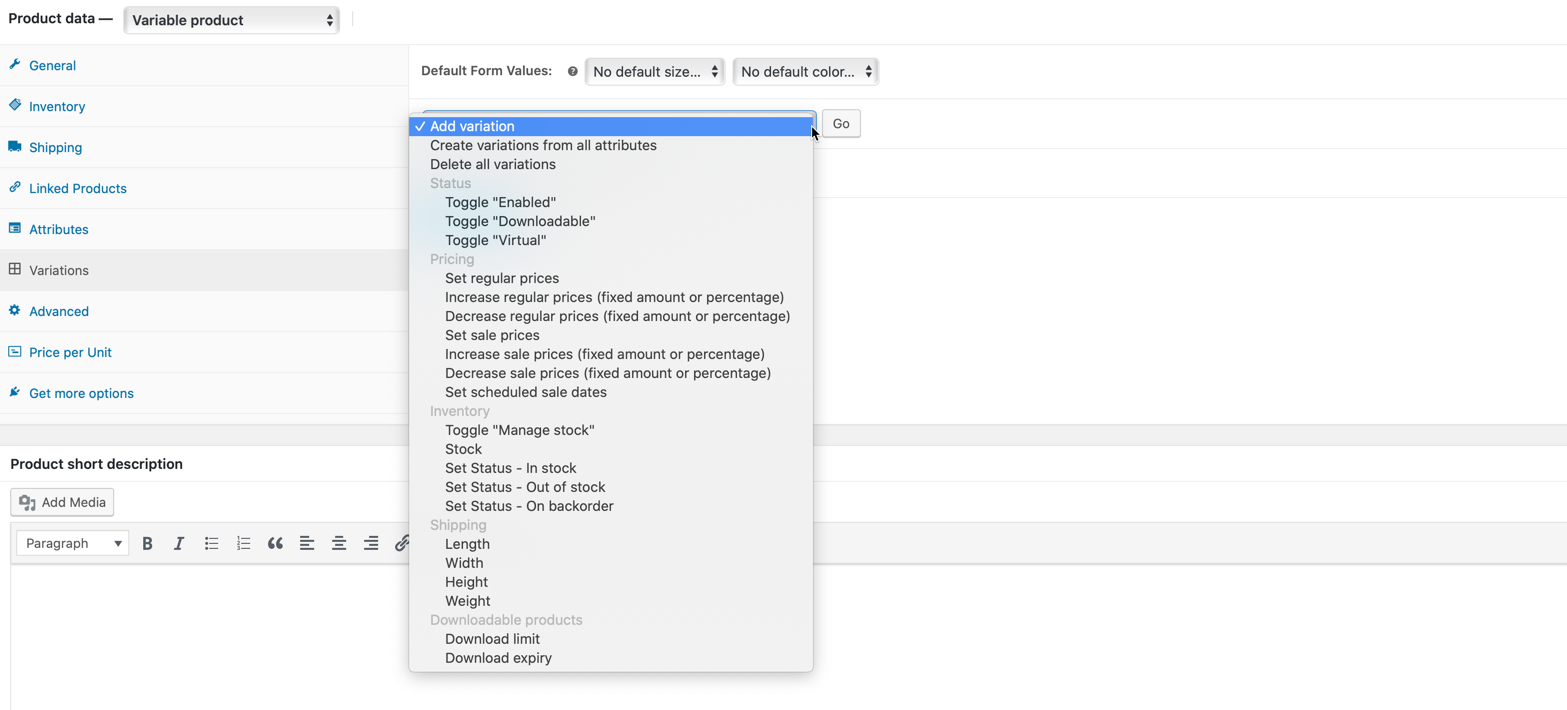
For example, select “Set Regular Price” or “Increase Price” and click the “Go” button. A selection box will open. Now enter “10,00” and confirm with “OK”, if you want to increase the price of all already created variations by 10 Euro. If you entered “10 percent”, all prices would be increased by the corresponding percentage.
Tip: You are still new in the world of WooCommerce or WordPress? You want to be informed about new tutorials? Then follow us on Twitter, Facebook or on our Newsletter.